Getting Around Apple Limitations: iOS Photos

Removing Synced Photos from iOS
If you take photos with your iPhone or iPad, there are two ways to manage your photos: sync to your computer using iTunes or use the cloud. While there are some benefits to using iCloud (e.g. your pictures being available to any of your Apple devices), there are some people prefer not to have their content on the cloud and would rather sync with their home computer.
While this article generally focuses on the solution with the Macintosh, the general underlying concept is applicable to a Windows PC as well where iTunes is being used to sync photos with an iDevice. As well, I use the term "iDevice" often as it is a blanked term for iPhones, iPads or anything else that runs iOS.
So the problem being addressed here is the rare situation where the synchronization of your photos between your Mac and iTunes can get confused and will no longer remember which photos have been synced to your phone. Loss of sanity happens and the result is that you have orphaned photos on your iDevice that are taking up precious space. Unfortunately in modern versions of iOS (10 and later) Apple suggests the only way to deal with it is to "Restore" the phone.
Why does this happen?
There are two categories of photos in this case:
-
1.Camera Roll - these are pictures you've recently taken that have not been synced to your computer yet.
-
2.Synced - pictures that are on your computer (iPhoto/Photos) that have been synced to your device by iTunes. On iOS 10+ you can tell the difference because they no longer have the trash icon to delete them.
I can't say I know the low level details of how the synchronization is working, but I can surmise from the behaviors and messages that iTunes only pays attention to photos that it has previously synced to your device and doesn't care about the ones on the camera roll. iTunes only keeps track of synced photos it had copied to the device previously and only knows how to manage them.
Because of the way that iTunes keeps track of synced photos, it will only remove the photos that it believes are on your device. Yes, it will blissfully ignore what it doesn't know about. I've proved this by telling iTunes to sync photos to the device that weren't on there and then told iTunes to no longer sync which gives the option to "Remove all photos from device". Selecting that resulted in it only clearing out those "newer" photos.
In short, iTunes only knows what photos it had sent to your device and doesn't check the device to see if there is anything else there. If iTunes loses track of what it synced to the device, it has no facility for managing those photos again. As well, given that iTunes has a good idea of how much storage should be available on the device, if your orphaned photos are causing a failed sync operation because it ran out of storage, it doesn't seem to bother figuring out why there is less storage than it thinks there should be.
So what do you do?
First step: back up your device
Since you are going to mess around with hidden parts of your iShiny device, it is best to ask iTunes to do a backup first. This is found on the summary page of the iDevice section of iTunes. If anything goes wrong, you need to restore your device from the backup file.
Second step: clear out your camera roll
Before we do some photo surgery, get any pending photos out of your device. If you've been using iPhoto or the Photos app to manage your photos, sync and delete from the device as you probably always did in the past. If you need a more drastic approach to this, you can use this somewhat obscure image capture application that comes with all Mac OS installations. Their are a number of guides out there which document how to do this, so I won't go into detail here.
Third step: get software to dig into the iDevice file system
In older versions of iOS this was trivial as he could either select and delete the pictures individually or go into the Settings->General->Storage and tell the device to clear out all documents and data for the photos section of the device. Unfortunately, you can no longer do either of these in the modern versions of iOS for some reason that I haven't been able to find online.
Now what you'll need is software to dig into the file system on the iDevice as this is something that is not readily exposed by Apple. Yes, there is a new 'Files' app on iOS 11, but this doesn't expose the details we need to get to and so you'll need some software that knows how to dig under the hood over the USB port. For this, I've used iMazing2 from https://imazing.com/ which is a commercial product that requires a license to do most features, but for messing with a file system seems to work fine with just a trial version. Install the trial, plug in your device via the USB cable and run iMazing. Note that when it asks if you want to install now or later, you can choose "later" if you don't plan on keeping it on your Mac.
Fourth step: clear out synced photos
The image below shows part of what the iMazing screen would look like. On the left is a list of iDevices you have so in the 'Available' section you should find your phone/pad/whatever.
-
1.Click the triangle to expand it and click on the 'File System' icon on the left (circled).
-
2.Navigate the file system on the right by expanding 'Media' and then 'PhotoData'. Do not confuse with 'Photos'.
-
3.You'll find three files named 'photos.sqllite', 'photos.sqllite-shm' and 'photos.sqllite-wal'. These are the internal databases of what your device's photo library is and we need to delete them to force the phone to forget about all photos. Select the files and click on the trashcan icon at the bottom of the iMazing window to delete those files.
-
4.Navigate further into the filesystem to the 'Sync' folder, you should find one-or-more 100SYNCD folders (the numbers would increase to 101, 102, etc. if there are multiple). Select and delete those folders the same way you deleted the database files.

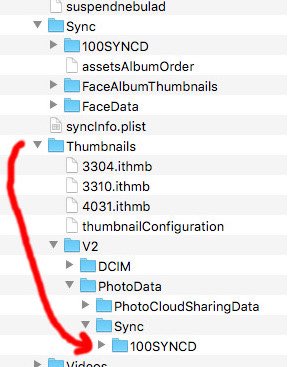
Fifth step: clear out thumbnails
Though we've removed the bulk of what is using the storage by getting rid of the synced photos, there are also orphaned thumbnails that need to be cleared out. The image below shows that below there is another folder in that 'PhotoData' subdirectory called 'Thumbnails' that you need to navigate into. Please observe that some of these directory names are named the same as what you saw in the last section.
-
1.Open the Thumbnails->V2->PhotoData->Sync directory as shown in the image below.
-
2.Just like in the last section, delete any '100SYNCD' named directories you find.
Final step: reset, rebuild and resync.
You're pretty much done now and you no longer need iMazing to be running. While I'm not sure it is entirely necessary, you should reset your iDevice before syncing it again to get stable. To reset, it is holding down the power button and the home button simultaneously for 4-5 seconds until the screen blanks.
Once you've reset, launch the Photos app on your iDevice. You shouldn't see any pictures other than the camera roll. Behind the scenes, the device will recognize that the sqlite databases are missing and will rebuild.
Finally, resync your device with iTunes with photos enabled and welcome back to a sane connection!
Conclusion
I hope this was helpful? Please let me know if you have any questions or comments by emailing be at brian at dronefone dotcom. Good luck!
Wednesday, March 7, 2018
